IMPORTANT: Before reading the instructions on this page, you must bear in mind that the configuration of the shipping zones section depends solely on WooCommerce. In other words, any failure or issue at this specific point. it is not the responsibility of Super Shipping for WooCommerce.
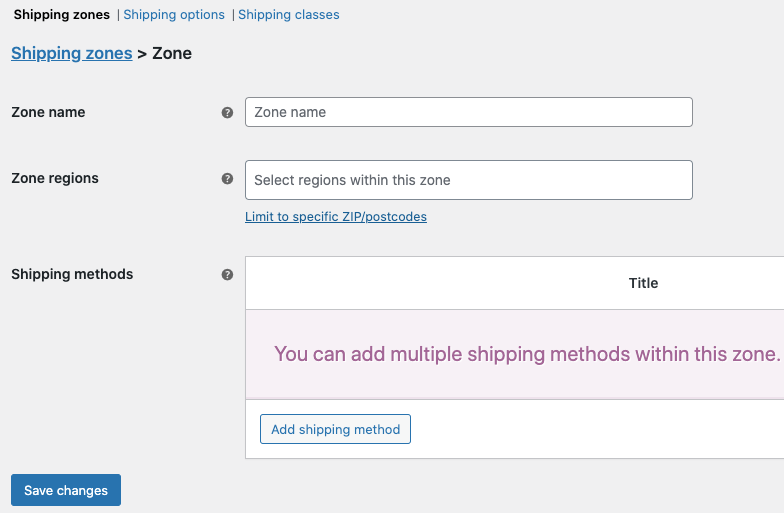
The shipping zone configuration page is divided into 3 parts:
- Zone name
- Zone regions
- Shipping methods
Zone name
This is used to give a name to the zone, and it will be the name displayed in the list of zones to distinguish one from another. You should use a simple title that helps you easily identify the region encompassed by that shipping zone. This name will only be visible to you and will not be shown to the customers of the store.
For example, you can use the word 'National' as the title for the shipping zone that covers the entire territory of your country.
Zone regions
In this section, you define the exact region that the shipping zone covers. It can be a continent, a country, a state, or a province/region. The list will be conditioned, however, by how you have configured the «Selling Locations» in the «General Options» of WooCommerce ('WooCommerce > Settings > General').
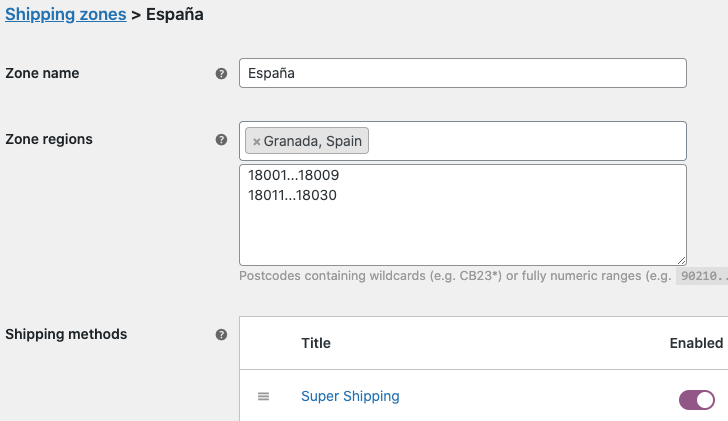
You can further restrict your shipping zone by using postal codes. If you click on 'Limit to specific ZIP/postcodes,' you can insert them so that the shipping method applies exclusively to them. For example, if we want to create a shipping zone only for the city of Granada (Spain) but excluding the El Albaicínneighborhood, then we should configure it as follows:
Country. In this field, we select "Granada, Spain".
ZIP/Postcodes. Here we specify the postal codes for the city of Granada. If it's for the entire city, it would be sufficient to write the first 3 digits of the postal codes common to all neighborhoods, followed by an asterisk, like this: 180*. This indicates that the shipping zone encompasses all areas of the province of Granada with postal codes starting with 180 (which are basically those of Granada city. If we left this field empty, the plugin would consider the shipping zone to cover the entire province of Granada). If we want to narrow it down to specific postal codes, we can insert each one on a separate line or separate them with commas. For this specific example, we wanted to create an exclusive shipping zone for the city of Granada but excluding the El Albaicínneighborhood. What we would do is create a range of postal codes that includes all codes except for Albaicín, which is 18010. It would look like this: 18000…18009 on one line; 18011…18030 on a second line (the range is separated by three dots ...).
IMPORTANT: I remind you that this configuration depends exclusively on WooCommerce, not on Super Shipping. So, if a specific state or province does not appear in the list, you should contact with WooCommerce support. However, it's likely that to add provinces or states to a country that are not included with WooCommerce, there might be a plugin that extends this functionality. The easiest way is to do a Google search like «Portugal provinces/states for WooCommerce,» for example.
Shipping methods
Finally, you will need to configure the shipping method that you want to assign to the shipping zone you have created. By clicking on 'Add shipping method,' a window will appear with a dropdown menu where you can choose the 'Super Shipping' method (it will only appear if you have installed and activated it) and set up your shipping costs using our plugin. You can find more information on this page or in the Advanced Configuration.
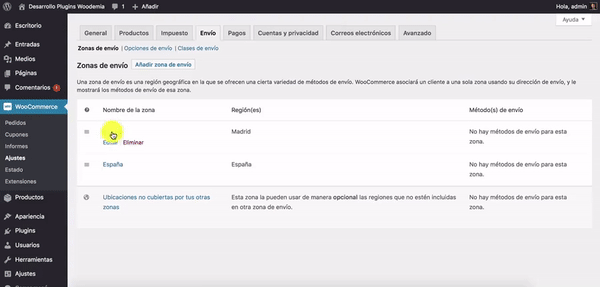
Excluding zones
If you want to exclude any province or state within a country, you should create a new zone for those provinces and not assign any shipping method to them. For example, if you ship to the entire Spain but do not wish to send to Canary Islands, you should create an exclusive zone for Canary Islands and leave it as is, without adding any shipping method, as I mentioned. Give it the name you prefer (Excluded Zone, Zone 0...). Finally, to make WooCommerce prioritize that zone over others, you need to place it at the top of the list (otherwise, it won't work). To move it, hover the cursor over the three lines on the left and move it upwards. There you go, you now have an excluded zone for your shipments.