Installation
Basic configuration
Advanced configuration
· Shipping costs based on weight and free for orders over 100€
· 2 shipping agencies for the same zone
· Different shipping rates depending on the type of product (or group of products)
· Different shipping rates depending on the supplier (applicable to Dropshipping)
· Increase the shipping rate for each unit added to the cart
Import and Export Rules
It is possible to export and import shipping rules from CSV files.
This greatly simplifies the shipping configuration process and saves you a significant amount of time when you need to add a large number of shipping rules.
This situation often arises when shipping rates are based on weight, and there is a significant difference in weight between the products (for example, products that weigh only a few grams and products that weigh several kilograms).
Usually, shipping agencies provide you with a large table containing weight ranges and their corresponding rates.
You can convert that table into a CSV file and import the entire rule configuration in a matter of seconds with just one click 😉
Export
To export the configuration of your shipping rules, simply go to the shipping method you want to export and click on the «Export» button in the lower right corner of the shipping rules table.
Once you do that, a file named wss-shipping-rules.csv with the configuration of the shipping rules for that method will be downloaded.

Import
To import shipping rules, you can use the same CSV file previously exported or create a new one from scratch based on the data provided by your courier agency.
The import process is straightforward, and you just need to follow these steps:
- Go to the shipping method for which you want to import the configuration.
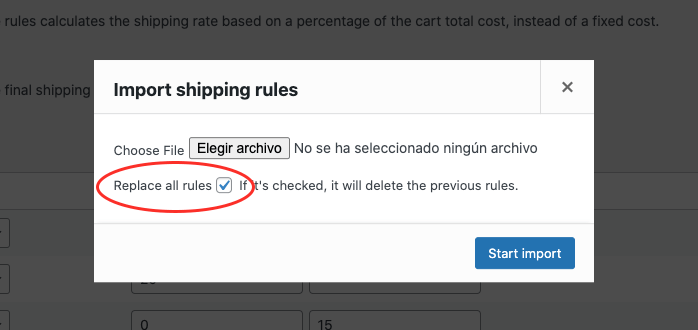
- Click on the «Import» button located in the bottom right corner of the shipping rules table.
- Select your CSV file from the import modal window. You'll also see a field called «Replace all rules» with a checkbox marked by default. As long as this checkbox is marked, the existing shipping rules will be replaced by the ones in the import file. Otherwise, the imported rules will be added below the existing ones.

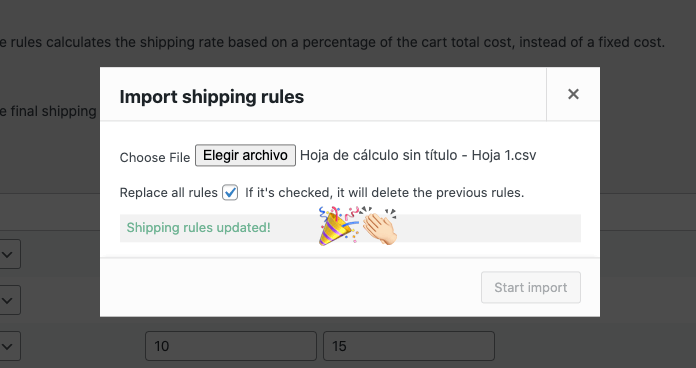
- Click on «Start Import» to initiate the process, and enjoy your favorite refreshment while Super Shipping does the work for you.

Once the import is complete, you can go ahead and close the modal window. You will notice that the shipping rules have been updated in the background without the need to save changes or refresh the page.
⚠️ IMPORTANT: This process may take some time depending on the size of the file being imported. Please be patient and DO NOT close the window until it indicates that the rules have been updated.
Create an import file from scratch
The file must always have the .csv extension and maintain the header of the import template. Otherwise, Super Shipping will not allow you to initiate the import process.
The header has the following structure:
| shipping_class | condition | min_value | max_value | cost | cost_per_additional_unit |
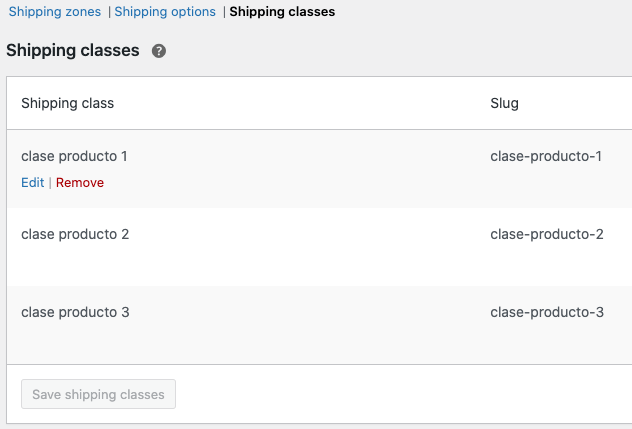
- shipping_class: It refers to the «Shipping Class» field, and in it, you should specify the slug of the shipping class for which you want to apply that rule.
If you are not going to work with shipping classes, then you should use «no-class» (without quotes), which is the default value when there are no classes.
You can find the slug for any shipping class from «WooCommerce > Settings > Shipping > Shipping Classes» in the "Slug" column:
- condition: here, you need to specify the ID of the condition type you are going to apply in this rule. Below, I'll show you the IDs for each condition:
Condition ID Weight 1 Price 2 Item count 3 Volume 4 - min_value: it's the minimum value of the range.
- max_value: it's the maximum value of the range.
- cost: it refers to the shipping rate assigned to that rule.
- cost_per_additional_unit (this field is optional): It's the cost for each additional unit that exceeds. It only applies when max_value is an asterisk (*).
⚠️ IMPORTANT: For all figures that have decimals, you must use a dot as the separator in the CSV file. If you use commas, the system will not recognize the decimal when importing. Once imported, WooCommerce will display the decimal separator in the format you have configured in the general settings, either a comma or a dot, after saving the changes.
For example, the data in the following CSV file:

Would be equivalent to the shipping rules settings shown in the following image with decimal separator as a comma:

And, in the case of this other image, with decimal separator as a dot, as set in the general settings of WooCommerce.

NOTE: It's possible that if you create the CSV file with Excel or similar software, the import may produce an error. We recommend always creating the file using Google Sheets, which is 100% compatible with Super Shipping.
